4 Steps to Optimize Images for SEO
The ins and outs of optimizing images and other types of media including MP3 and MP4 — size, speed, coding and accessibility.
One of the most frequently asked questions here at Restored 316 is “why is my site speed slow.” Most often it is because images and media files have been uploaded at a very large size and take quite a bit of time to load. This post will help you understand four important steps to optimizing images.
SIZE & SPEED
Images and other media like videos and sound files (MP3) tend to be quite large.
Note: when we talk about ‘large’ with media, we’re usually talking about the amount of space that it takes up electronically – as measured by kilobytes(KB), megabytes(MB) and gigabytes(GB).
In this tutorial, we’ll speak of a file’s dimensions (width and height) as well as its size (KB or MB etc). Text is really really small – just bytes and kilobytes. Images, videos, and other media are quite large by comparison, starting at KB and going up.
The size of an image matters because the bigger the size, the longer it takes to load, making your site slower to load. This impacts SEO and user experience.
The size of an image is also impacted by meta data that is attached invisibly to every image by the camera. This data contains information like the type of camera, lens, and other data pertinent to photographers. This data is completely useless for your blog readers and can be easily removed. We’ll cover how to do that below.
You can shrink the size of an image by shrinking its literal dimensions. Most images taken on cameras are 300dpi (dots per inch) and have dimensions around 3600px – 5600px in width. If you leave your photos like this, they will be HUGE – like in the 100MB range. The goal is around 100KB (that’s 1000 times difference).
Note: with images, we’re talking about the width only, because width of the screen/device is what we want to consider. It is perfectly fine if the image is portrait or landscape – it doesn’t matter. Aesthetically speaking, you’ll want to pick one and stay with it though!
So whether you use Picmonkey, Canva or Photoshop, they all have a medium-quality option, or a million more settings if you’re using Photoshop. At the end of the day, you want to save your image in a small, medium quality jpg without any extra meta data. Now let’s talk about the dimensions before you save that baby.
IMAGE DIMENSIONS
Most of the common wisdom around sizing is to shrink your images to around 600 – 800px wide. This is because it is the smallest image you can get away with in your theme. And that means it is great for size and speed.
If you’ll indulge me for a moment, I want to propose that we should upload images at 1700 – 2000px. If you think at least a year ahead. What happens when ALL screens are retina ready and we need our images to be double their current size?
What happens when our new theme next year requires images that are 1100px or 850px wide?
What you’ll have to do at that time, is go to your original images (those 3600px ones) and re-upload every single one of them. I don’t know about you but that sounds like a terrible waste of time!
Do any of you remember dial-up internet? We would absolutely recommend small images then! It took us forever to download just one image! In today’s age of what-ever-it-is now, we can get away with 2000px images.
IMAGE OPTIMIZATION PLUGIN
We recommend a plugin like Short Pixel that optimizes your images. For fashion photographers and foodies, I recommend the lossless option (you don’t lose any quality). For everyone else, the naked eye really won’t be able to tell if you use lossy or glossy to optimize your images. The first 100 photos with Short Pixel are free every month.
BEST PRACTICES
Let’s sum up the sizing best practices:
- 1800 – 2000px wide
- 100dpi
- remove meta data
- optimize with plugin
CODING & ACCESSIBILITY
Images, like all other things on the internet, are written in code. There are two things in this code that we need to know for SEO. They are “alt” tags and “title” tags.
- alt tags = the tag that describes the image to the screen reader
- title tags = the title of the image, it is unlikely this is still used in the SEO algorithm
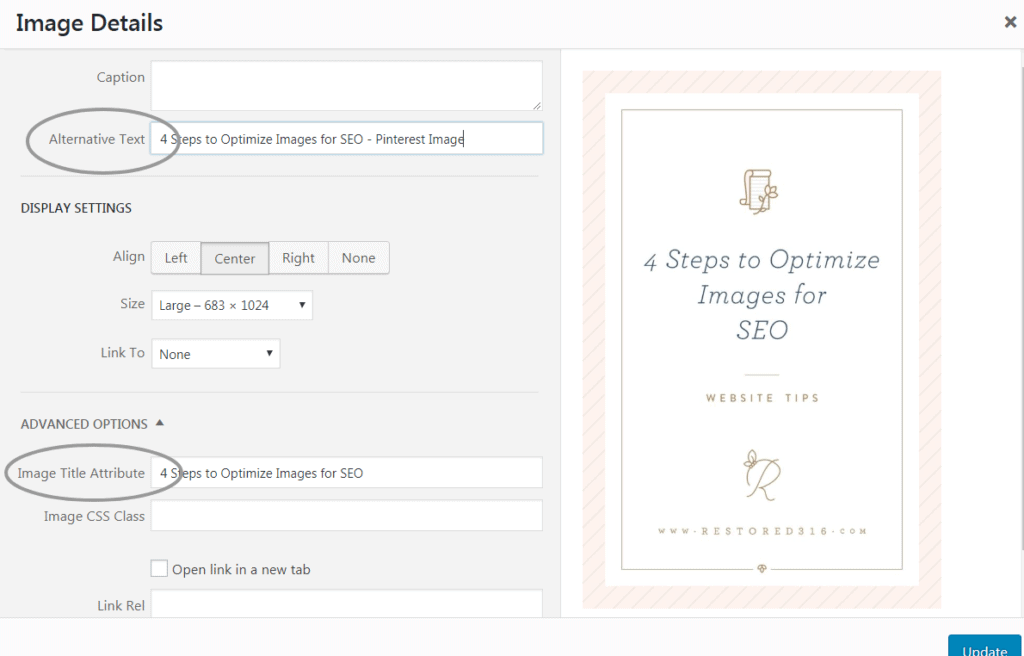
Every image in the WordPress media folder will present an ‘alt’ and ‘name’ field.
Keywords will naturally fit in one or more of your posts’ images, assuming the images are related to the topic at hand. So use the keywords where they fit naturally. Keep in mind that the screen reader is using this to describe the image to the vision impaired.
Here’s an example. A visual browser (yours) will show this image:

In WordPress Media tab, this image should have the alternative text and title attributes completed like this:

Every image in a post will not be the same; so don’t use the same alt and name tags.
CONCLUSION
This is all there is to using images, video and more in your posts and pages.
- Shrink and save them.
- Upload them and add alt tags.
- Optimize with a plugin.


Question. I have a Mac and use Canva. To resize, I’ve been going to Tools > adjust size, changing the resolution to 72 and width to 600 or 800. Does the Smart Pixel plug in remove meta data and change the dpi to 100 for you, or should that be done separately. How is this achieved? Thank you for your help!
Hi Katelynn,
I’m not sure. You might reach out to the support team at Smart Pixel on this. They will be able to verify how their plugin optimizes the images.
Thanks for telling optimum width and that removing the meta data from images to reduce the size.
Can we… remove meta data via Photoshop?
Please, let me know.
Thanks,
Arpit
Yes … you should be able to do this in Photoshop. You can search Adobe’s tutorials to find the best way to do this.
Hello,
Thank you for the useful post.
I was wondering if you should delete all meta data?
Doest google not use the meta data to rank?
What about images that U are only going to use for thumbnails, do U have to make them 1700-2000px as well?
Also, I installed the shortpixel plugin and it says I have 2500 thumbnails, yet I haven’t even published my website because I want to have 5 posts first.
How do I have 2500 thumbnails then?
Hi Thomas,
Google does need the meta data to crawl, so you don’t want to delete any of that.
WordPress automatically creates I believe three thumbnail sizes of each image. Then your theme might also add additional sizes. There are also several plugins that might add additional sizes.
Hope this helps!
Hi Lani,
I hired someone to help speed up my WordPress site and he told me to only set the image to the exact size my site needs.
However, your recommendation to future-proof by sizing between 1800-2000 px makes sense to me.
This would make my pages a lot bigger and require longer loading—is it worth doing?
Hi Chrissy,
We make this recommendation because our themes use a variety of featured image sizes. Having the larger original image size allows for all featured image dimensions to be generated.
You’ll still want to make sure that your images are optimized and compressed so that the actual file size is minimal.
Hope this helps!