How to Add an Icon to a Menu Item in Kadence
In the world of web design, every detail counts, and one effective way to make your website stand out is by customizing even the tiniest elements. If you’ve ever wanted to bring attention to a specific menu item or infuse a touch of uniqueness to your site’s navigation, you’re in the right place. In this tutorial, I will guide you through the process of adding a custom icon to a menu item in Kadence. Whether you’re looking to use your own custom icons alongside your menu items or simply elevate the visual appeal of your website’s navigation, this step-by-step guide has you covered. Please note that you’ll need Kadence Theme Pro to follow along with this tutorial, so make sure you have it installed and activated before diving in. Let’s get started!
Enable Ultimate Menu in Kadence settings
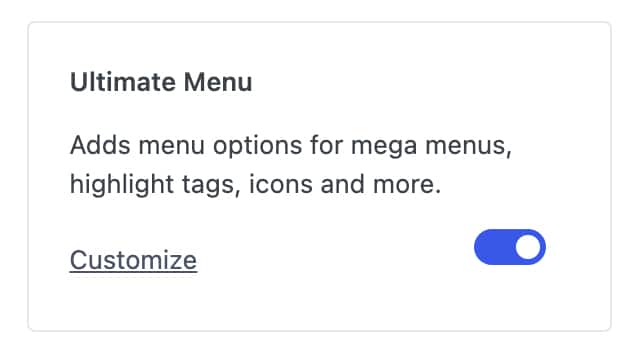
The first crucial step in customizing menu icons in Kadence is to enable the Ultimate Menu feature within your Kadence settings. This powerful feature allows you to take full control of your website’s menu, giving you the ability to add custom icons to your menu items and more. Our focus in this post will be solely on getting a custom icon next to your menu item(s).
To enable Ultimate Menu, navigate to Appearance > Kadence. Under the Pro Add-Ons make sure the Ultimate Menu toggle is turned on. If you have never turned this one, this will be off by default. Once you toggle this on, it’s automatically on and you don’t need to save this page. You can now hit Customize and this will take you to your menus section.

Create or Edit your Navigation Menu
Create your Navigation Menu
You may first need to create a new menu within your WordPress dashboard. To do this, head to the “Appearance” section, then click on “Menus.” From there, select the option to create a new menu. Here, you have the opportunity to curate your navigation menu by adding your desired pages, categories, and any other relevant links. Once you’ve created your menu to suit your website’s needs, it’s essential to assign this menu to the specific location on your website where you want it to appear. Finally, don’t forget to hit the “Publish” button to ensure your newly created menu is live and ready to be customized with custom icons using the Ultimate Menu feature in Kadence.
If you’re unsure of where to assign your navigation menu, you can navigate to Appearance > Customize > Header. You’ll see a box at the bottom of the page with different elements that you have in your header, alongside your logo. You’ll have one called Primary Navigation and potentially one called Secondary Navigation. This shows you where your navigation menu is placed in your header, so you know which menu to assign where.

Edit your Navigation Menu
Once your menu is created and saved (it does have to be saved first), it’s time to add some pizzazz with your favorite icons! Thanks to the Ultimate Menu feature in Kadence, when you open up the link you’d like to spruce up using the small triangle to the right of your link, you’ll see a new button that says “Menu Item Settings”. Clicking this button is like unlocking a treasure chest of customization options.
In this pop-up, you get to pick from all your icons and colors. First, pick an icon that you love from the “Menu Item Icon” drop-down menu. Picture-perfect! Now, decide if you want your icon to be on the left or the right side of your link.
Don’t like the icons available to you in this drop down?
You can upload your own Custom Icons with this tutorial right here:
How to add Custom Icons to Kadence
We’re not done yet! Dive into your brand colors to choose the one that suits your icon and navigation best. And when it comes to size, you’re the boss. You can make your icon as big or as tiny as you want, all in proportion to your menu label. Usually, I like to keep it at 100% so it’s nice and balanced, but feel free to play with this to find a size that works best for you. With these playful customizations, your menu will be the life of the party on your website!
Publish your changes and admire your new navigation menu!
So there you have it – adding custom icons to your menu items in Kadence is a breeze with the Ultimate Menu feature. It’s all about injecting your website with personality and flair, making navigation a delightful experience for your visitors. Whether you’re guiding them through your site’s pages or pointing them towards your latest blog post, these icons will grab their attention and leave a lasting impression.
Remember, the Ultimate Menu feature in Kadence is just one of the many tools at your disposal for crafting a website that truly stands out. As you continue to explore and experiment with customization, your website’s unique identity will shine brighter than ever.
We hope this tutorial has been both informative and fun, helping you take your website design to the next level. If you have any questions or want to share your creative menu designs, don’t hesitate to reach out. Happy icon-customizing, and may your website navigation be as beautiful as your WordPress Theme!


ty so much! I am really enjoying kadence themes!!!