How to use Categories in WordPress
What is a Category?
In WordPress, a category is a way to organize and group your posts into different topics or sections on your website. Categories help both you as the website owner and your visitors to navigate and find content more easily. Here’s how categories work in WordPress:
- Organization: Categories are like folders or containers for your posts. You can assign one or more categories to each post to indicate the main topics or subjects it relates to.
- Navigation: Categories are typically displayed in the sidebar or menu of your website, allowing visitors to click on a category to view all posts related to that topic. This makes it easier for users to find specific content.
- Hierarchical Structure: Categories can have a hierarchical structure, meaning you can create subcategories within categories. For example, you might have a top-level category called “Recipes” and subcategories like “Breakfast” and “Lunch.”
- Default Archive Pages: WordPress automatically generates category archive pages. When a visitor clicks on a category, they are taken to a page that lists all posts assigned to that category.
- At Restored 316, our categories include Business Tips, Website Tips, Design Tips, Kadence Tutorials, and a few others! You can click any of those links to get a real life example of an Archive Page.
- SEO Benefits: Properly using categories can improve your website’s search engine optimization (SEO). They help search engines understand the content and structure of your website.
How to Add Categories
Creating categories in WordPress is a straightforward process. Here are the steps to create categories for your WordPress posts:
Login to your WordPress Dashboard
Access your WordPress admin area by navigating to the login page (usually `yoursite.com/wp-admin`) and entering your credentials.
Access the Categories Section
Once you’re logged in, you will be taken to the WordPress dashboard. In the left-hand menu, hover over “Posts” and then click on “Categories.”
Add a New Category
You’ll be taken to the Categories screen. Here, you can see a list of existing categories if you have any. To add a new category, find the “Add New Category” section on the right side of the page.
Fill in the following information:
- Name: Enter the name of the new category.
- Slug: This is the URL-friendly version of the category name, usually lowercase and without spaces. If you enter nothing here, it will automatically generate one once you publish the category.
- Parent (optional): If you want to create a subcategory, you can select a parent category from the dropdown. Subcategories are useful for organizing your content hierarchically.
- Description (optional): You can provide a brief description of the category if you wish. This space is great for SEO if you’d like to fill it in, but it is optional. This description will also appear at the top of your Archive page for this Category.
Publish the Category
After filling in the necessary information, click the “Add New Category” button. Your new category will be created and listed among your categories.
How to Assign Categories to Posts
Now, when you create or edit a post, you can assign categories to it. In the post editor, you’ll see a “Categories” box on the right side of the screen. Simply check the checkboxes next to the categories you want to assign to the post.
Note: If you are working with Parent Categories and Subcategories, please know that if you file a post in a Subcategory, this post will automatically appear on the Parent category archive page, therefore you don’t need to file your post in the Parent AND Subcategory – only the Subcategory.
Update or Publish the Post
After assigning the category, save your post as a draft or publish it to make the category assignment active.
How to Bulk Edit Posts to Assign Categories to Posts
Select the Posts you’d like to edit
If you have several posts that you want to file into your new category, you can bulk assign categories to already published posts. You’ll navigate to “Posts” from the left sidebar. Once there, you’ll put a checkmark next to each post that you’d like to edit. With all posts selected, you’ll then choose the dropdown next to Bulk, and choose “Edit”. Next, you’ll click the “Apply” button.
Bulk Assign Your Categories

Once you click Apply, you’ll see a box pop up that has options to Bulk Edit your selected posts. In the Categories box in the middle, you will put a checkmark next to the category/categories you’d like to add these selected posts to. Once you’ve selected all the categories, you’ll click the blue update button and now all your posts will be added to the Archives pages for the categories selected.
Your WordPress posts will now be organized into the categories you’ve created, and visitors can access these categories through your website’s menu or other navigation elements, making it easier for them to find content that interests them.
Edit the Appearance of your Archives
By default, your Archives will be designed the way they are in the theme that you have selected, but you actually are able to edit the way this appears.
If you navigate to Appearance > Customize > Posts/Pages Layout > Archive Layout you’ll see all the options that can be adjusted to customize the way your Archives appear. While inside the Customizer, if you navigate to an Archive page while making adjustments, you can see how each setting will affect your site. Once you’re done making any edits, you will hit the Publish button and those changes will immediately take effect on your live website.
How to add a category to your navigation menu
If you’d like to add a Category directly to your navigation menu, you will navigate to Appearance > Menus. Once here, you’ll choose the menu that you would like to edit from the dropdown at the top of the screen.

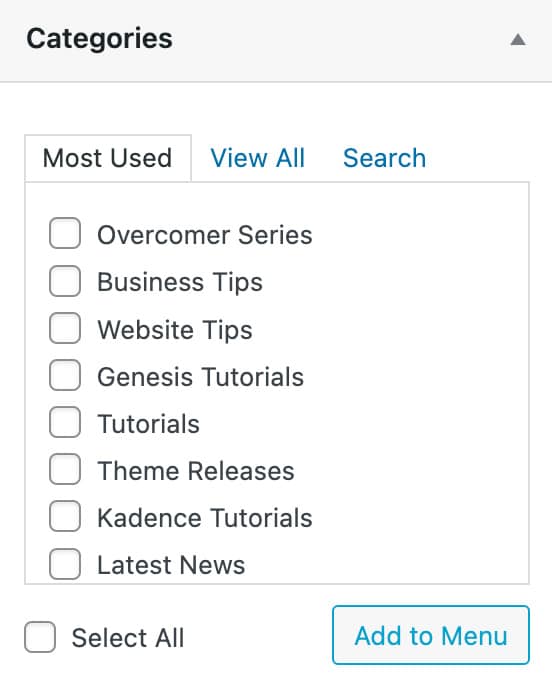
Once you’re editing the correct navigation, you’ll see a Categories box on the left side of the screen. You can checkmark as many categories as you wish, and then click the “Add To Menu” button and your selected categories will be added to the navigation menu.
From there, you can pick up and drag/drop the menu items into the order you’d like them to appear in your menu.
Once you’re done making your edits, don’t forget to hit that “Save Menu” button in the bottom right of the screen.
Still have questions on Categories? Comment below and we are happy to help!


Hi Lesley,
thanks for this helpful post. I just learned that I can add these pieces of information to my category pages! Will try that soon!
Maybe you have some advice on another “category matter”. If I use categories AND subcategories will I add a post to both of them or only to the subcategory? I always wonder what the best way is when creating a blog post. Thanks in advance.
Best wishes
Carolin
Hi Carolin,
You can use both categories and subcategories for one post. The main category is going to be very broad like “decor” then the sub category could be something like “holiday” your tags would be “Easter, Christmas, Valentine’s Day”.
I’M HAVING DIFFICULTY IN A FEW AREAS- I WOULD LIKE TO ADD AN ABOUT ME PAGE- I TYPED SOMETHING UP BUT IT DOESN’T SEEM TO BE MINIMIZING-LIKE CLICK ON TO READ MORE-THE WHOLE POST IS SHOWING UP- ALSO, I WOULD LIKE TO ADD A LETS CONNECT FOR PEOPLE WHO VISIT SITE CAN PUT THEIR EMAIL IN-HOW DO I DO THIS?
Hi Allison,
Thank you for choosing our Market theme for your website.
Can you please submit a support ticket so we can provide assistance to you?
Thank you!
this is helpful thank you.
How do you only display featured image and not excerpts from the post under the category ?
Hi Shrilatha,
This would require a bit of code change. Go ahead and submit a support ticket and we can help you with this!
Is there a way to customize the title and paragraph font in the category description? I have the Glamour Kadence.
Sure! You can adjust this under Appearance > Customize > Posts/Pages Layout > Archive layout. Then go to the Design tab and you’ll see options to adjust the fonts there!