How to set up the Genesis User Profile widget and create a gravatar.com account
You know that little image around the “About” section at the top of the sidebar in our demos sites.. this is called a Gravatar and is actually set through a third party so that it appears on all sites that import a Gravatar.
Today we are going to learn how to remove that shadow box figured image from your Genesis User Profile and insert your own photo, as well as how to set up your Genesis User Profile.
![]()
Setting the Profile Image
First, you’re obviously going to need to choose the photo that you want to use for your profile image. This image is important because this is the photo that is going to not only show up in the Genesis User Profile widget on your website but also in your comment section when you reply to comments on your blog and on any other blogs you may be commenting on. Keep in mind that this image shows at different sizes throughout sites, and it’s typically pretty small so a tight crop of just your gorgeous face is ideal.
Once you’ve chosen a photo, you’ll want to visit a site called Gravatar. You’ll be asked to create an account (for free), and then once you sign in asked to upload your photo. Just be sure you use the same email address as the one used on your WordPress user profile when creating this account. Once you upload it and hit save, you will have to wait a few minutes, but you should see your new Gravatar appearing in your profile widget within 20-30 minutes at the very longest!
In the future if you’d like to update this image, you’ll login to Gravatar and you can upload a new image and set it as your default image and that will automatically update for you.
Setting up your Profile
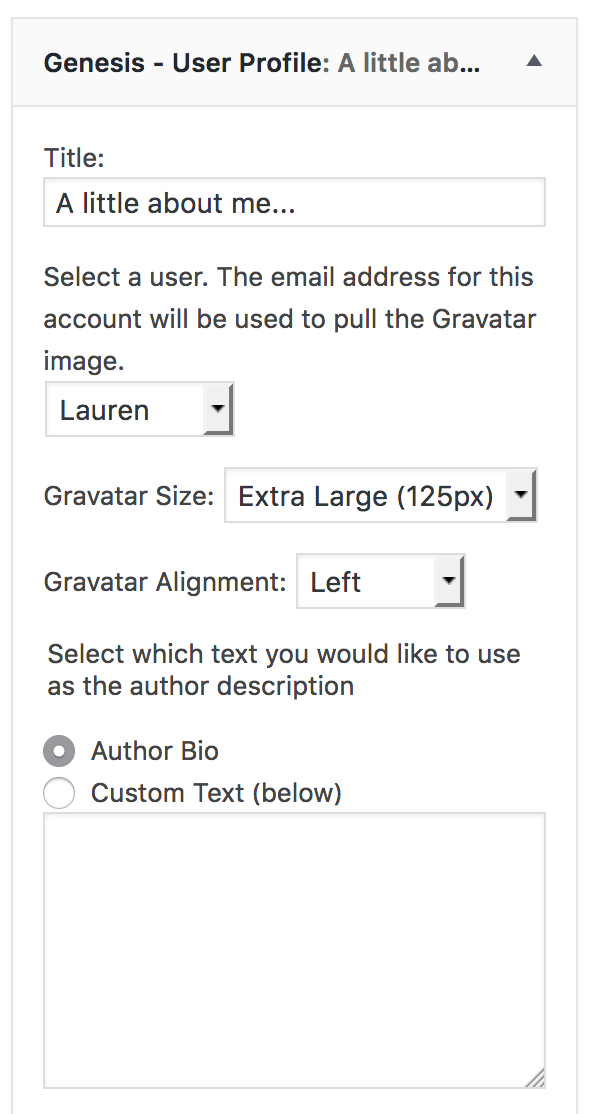
Now that you have an image, you’ll want to create a little bio about yourself to display in the Genesis – User Profile widget.

Author Bio
In order to use the Author Bio option, you can fill out your User Profile via the WordPress Dashboard. Simply navigate to USERS > YOUR PROFILE and then scroll down to the section that says Biographical Info. This is where you can put your own personal information that you want readers to see when they first see your profile. Once you do that and hit “save” you will have the option in the actual sidebar widget to display your profile.

Custom Text
You can also choose to use the Custom Text option. Some prefer to use the Genesis User Profile to present a welcome message to readers. If that’s the case, you might consider using the Custom Text option rather than the Author Bio. Then you can modify that text without having to change your bio any time something is different.
You’ll also notice that there are a few other options available with the Genesis User Profile widget, such as where to send readers to if they want to know more. You can customize that Read More text to say anything you prefer; as well as have it link to any page on your site! Most tend to direct that to their extended bio or their “About” page, but that can be modified to better serve your needs and the needs of your site!
![]()


Thank you so much! I spent 2 hours this morning trying to figure this out. WIth your instructions I did it in 10 minutes.
Hi there- thanks for the easy tutorial. One follow up question…the genesis user profile widget allows photo size small to XL 125 pixels. I have mine set to XL but my photo is still only about 1/4 the size of the example shown on this page entry of Lauren. How can I get a larger pic? Or is that not possible with the (sprinkle) theme that I have?
thanks!
The typical size of the gravatar in the comments section on sites is 48×48 unless it’s purposely increased on the design of the site. Gravatar will have you upload it larger so it will appear larger in the places it called for it larger. For instance, if you go here you can see all the images there are pulled from gravatar but are set to show larger.
Is there a way to change the font size of the bio in this widget? I can’t seem to find it in the css and it doesn’t let you change straight from the widget either. Thank you.
Hey Anna!
You can change it via the CSS, but you’ll have to target it specifically. You’ll want to target .user-profile below the body section of your site (at the top where you designate your default font style). So it would look something like this:
.user-profile {
font-family: YOUR CHOSEN FONT FAMILY;
font-size: CHOSEN FONT SIZE;
}
You can obviously add any other styling there as wel; (font weight and transformation, etc.) 🙂 Hope that helps!
Hello!
I am enjoying all the tutorials, Thank you!
My image is still not showing up even after using your helpful tutorial. I have two emails registered and both have been confirmed on the Gravator site and show the images, but the image is still not showing up on my site. Any suggestions? I have the Tasteful theme.
Thanks you!
Hi there! I’m so happy you’ve been enjoying the tutorials lately!
If your image isn’t appearing at all, then you’ll want to see this post that will walk you through that.
Ok, I’m aware of how to create the standard Genesis user image with the widget. But I like the look and display of the one on this page at top right. How do you create a user profile that displays like that?
Second question so not have to ask it again in another tutorial but related to this one also is, how do I configure it so that I can place a user profile that appear at the end of a blog post before the comment section? For example, similar to the user profile on this page before the blue newsletter signup box. If there is a tutorial on it, can you please point me to the correct one.
All things otherwise, these Tutorials are extremely helpful!
The user profile on our sidebar is custom coded. The one in posts before the signup box can be done using the Simple Author Box plugin: https://wordpress.org/plugins/simple-author-box/. Hope this helps!