Canva Brand Kits: Your Ultimate Design Companion
Having a consistent and visually appealing brand is essential for every online business owner. Canva, a popular graphic design tool, offers a powerful feature known as the “Brand Kit” to help you maintain brand consistency effortlessly. In this blog post, we’ll explore what a Canva Brand Kit is, why you should use one, and how to set up your Brand Kit in Canva.
When I do custom branding design for clients, this is one of the first things I do once we wrap up branding! This ensures that my client will be able to keep their branding consistent throughout any new graphics they need to create for their blog or business. My clients are always so grateful for this feature so I wanted to help all of you be able to achieve the same thing with your own branding materials!
I also create a Branding Kit for every Kadence WordPress Theme I design so I can easily create Social Media Bundles with all the same colors, fonts, and graphics that are a part of that theme’s aesthetic. This makes my design process so fast, efficient, and consistent!
Before we dive into the what, why, and how, I need to tell you that in order to create your Canva Brand Kit, you will need the Pro version of Canva. Canva is $14.99/mo (as of this writing) and I think this is one the best monthly expenses you can have for your business. I am not an affiliate so I gain nothing by telling you that, I just genuinely think it’s one of the most helpful softwares available for business owners.

What is a Canva Brand Kit?
A Canva Brand Kit is a collection of design elements that represent your brand identity. It includes your brand’s colors, fonts, logos, and any other visual assets that define your brand. By creating a Brand Kit in Canva, you can streamline your design process and ensure that all your marketing materials and graphics adhere to your brand’s guidelines and are readily available when you need them!
Why Use a Brand Kit?
We’ve already covered quite a few reasons why I think having your Canva Brand Kit set up is super helpful, but let’s break down all the benefits specifically:
Consistency: A Brand Kit ensures that all your design materials are consistent, making your brand instantly recognizable to your audience.
Efficiency: With your brand assets readily available in one place, you’ll save time on design projects.
Professionalism: A well-maintained Brand Kit can elevate the professionalism of your brand, making it more appealing to customers and clients. This shows that you take your brand seriously!
Brand Identity: It helps reinforce your brand’s unique identity, making it easier for your audience to connect with your message.
How to Set Up Your Brand Kit in Canva
Setting up your Brand Kit in Canva is a straightforward process. Here’s a step-by-step guide:
Create a Canva Account: If you haven’t already, sign up for a Canva account or log in to your existing account.
Navigate to Brand Kit: Once you’re in Canva, go to the “Brand” section on the left sidebar.

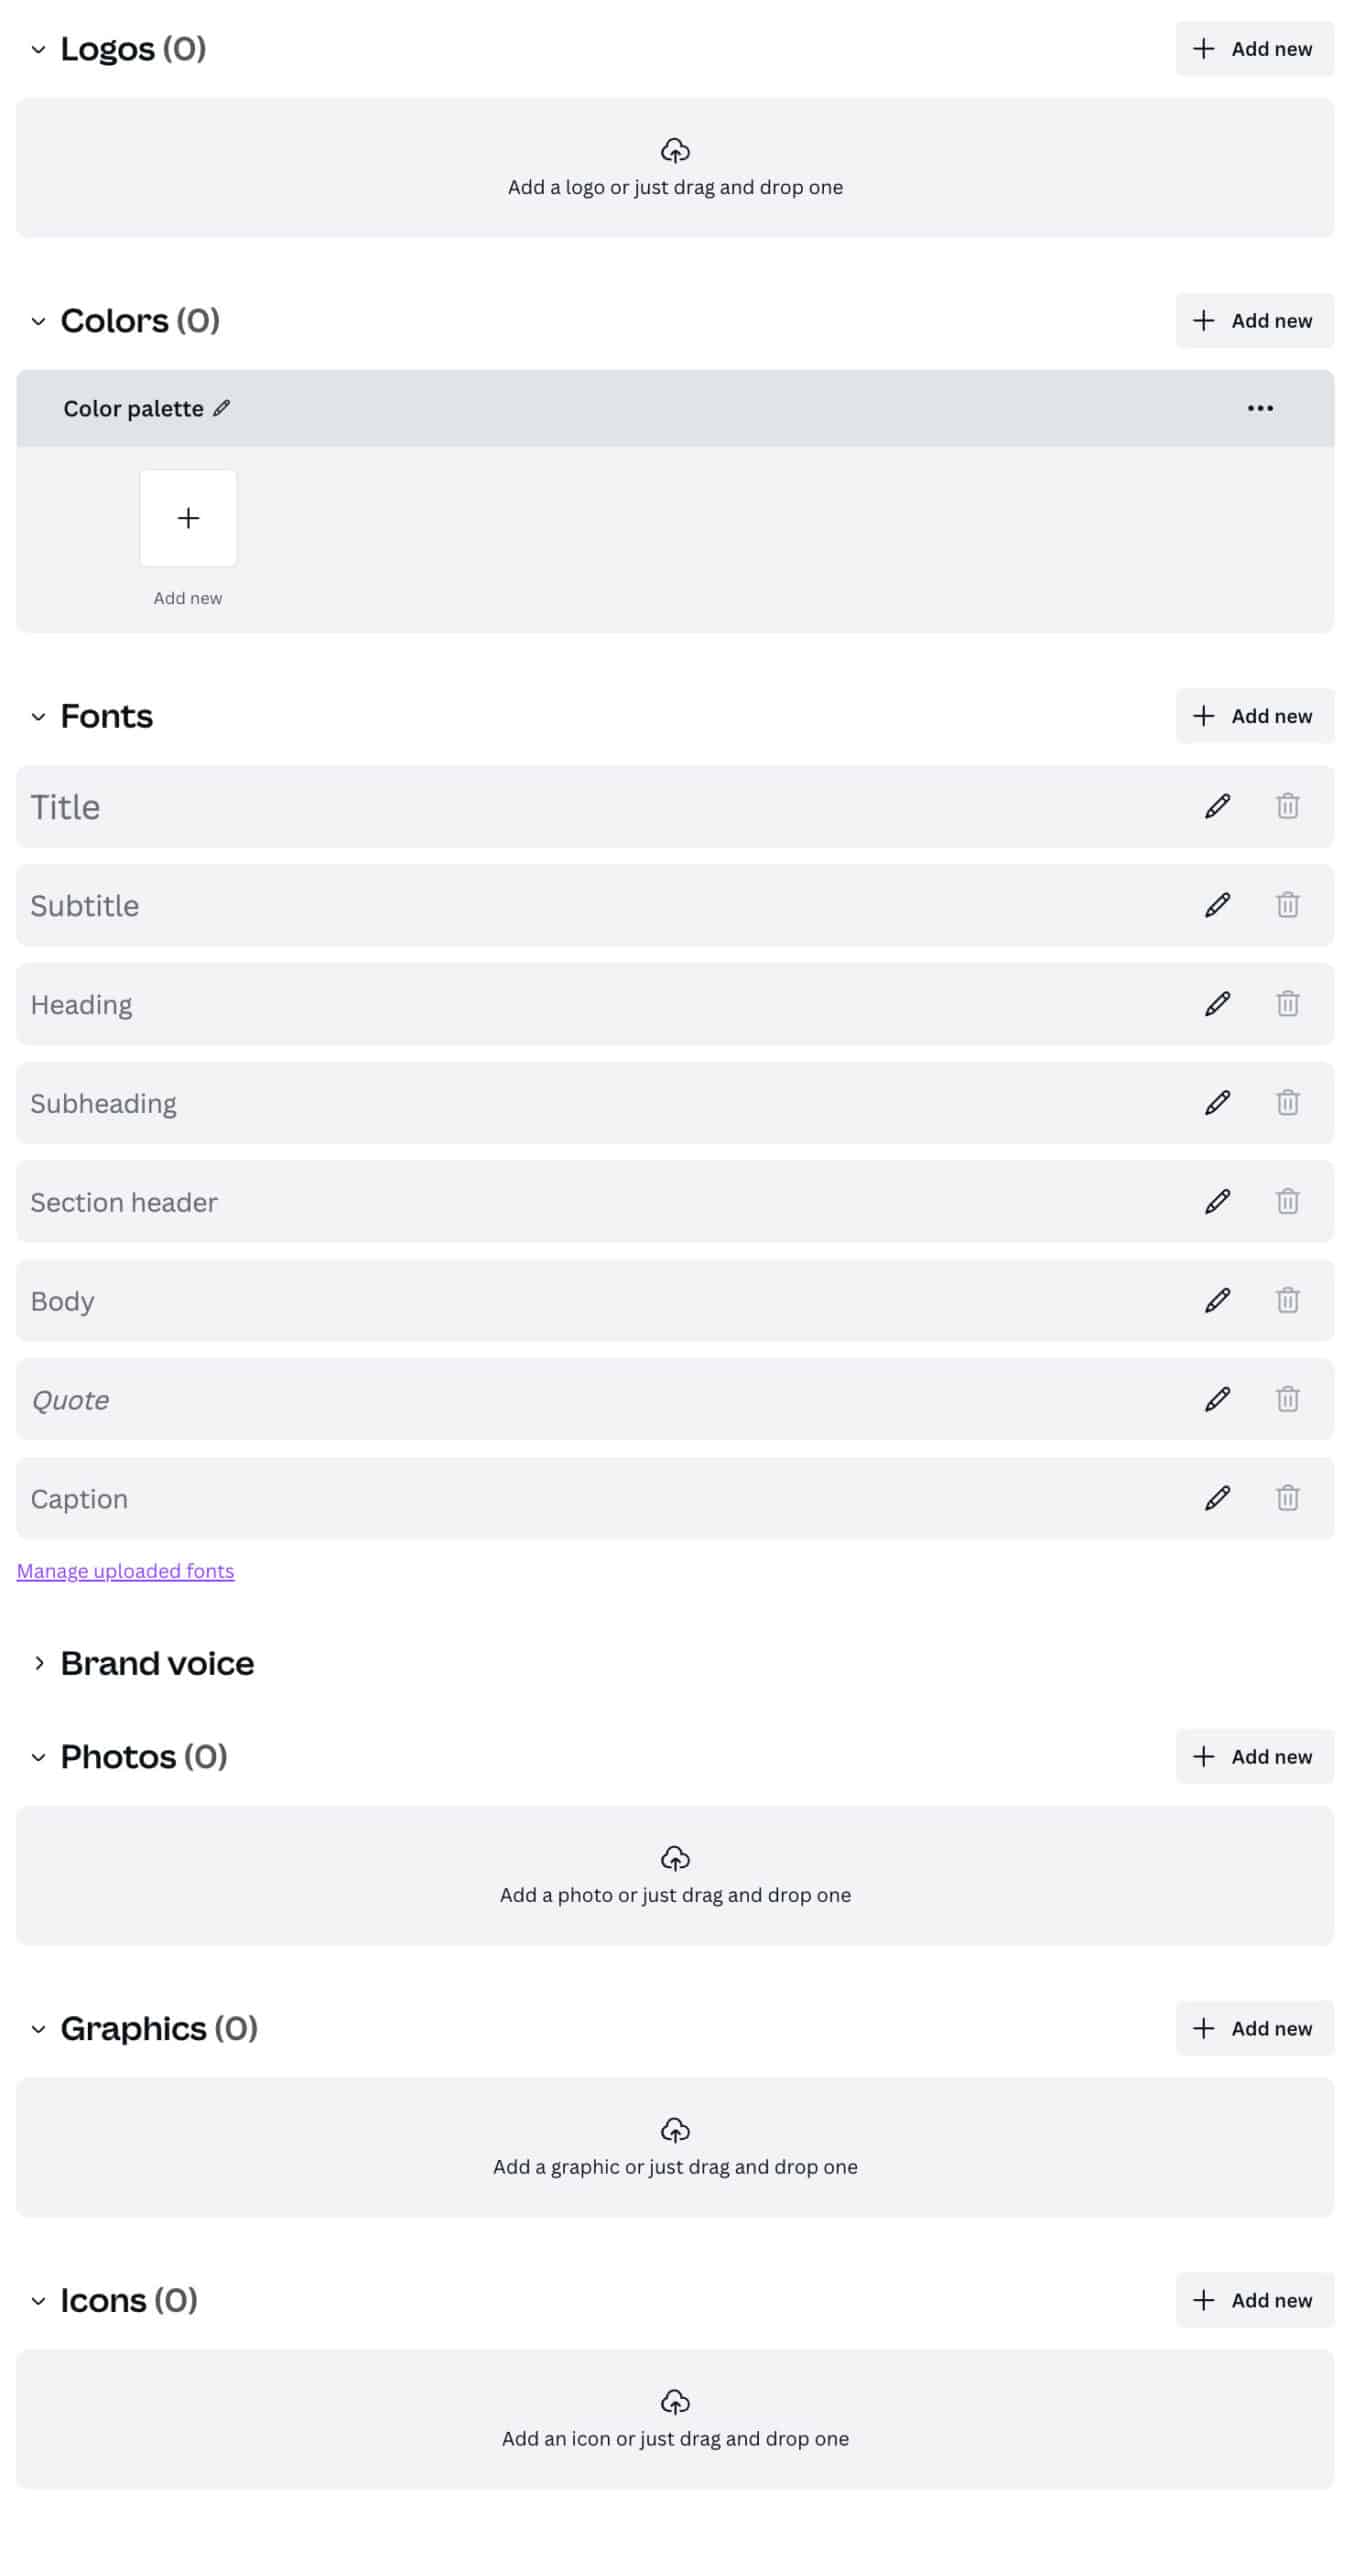
Add Brand Colors: Enter all your brand’s colors by providing their HEX color codes. Also consider adding some light versions of your colors if your brand consists of a lot of bright or bold colors. Those lighter colors will come in handy when designing future marketing materials. I also like to add one color for white (#FFFFFF) as well just so I have it available in my palette.
Select Brand Fonts: Choose the fonts that represent your brand. You can choose fonts for your Title, Subtitle, Heading, Subheading, Section Header, Body, Quote, and Caption. You don’t necessarily have to fill all these in, but I typically set the Header, Subheading, Section, and Body areas for my clients. Canva offers tons of font options, so pick ones that align with your brand’s personality or if you have the proper licensing for a custom font, you can upload your own file and then set the font and size to the appropriate heading.
Upload Brand Files: Upload your brand’s logos in different formats, ensuring you have both a light and dark version to accommodate various backgrounds.
Don’t have a brand established yet? Consider using our Quick Start Logo Templates and check out this article on choosing a color scheme for your brand with lots of help tips and a free template!
What file type is best for Canva Brand Kit Assets?
My first choice is to upload all SVG files for two reasons:
- SVG files are vector files, so no matter what size graphic or file I’m designing I can increase or decrease my brand elements and they will remain crisp and clear at all times.
- If an SVG file has less than 5 colors in it, I can easily edit the colors directly in Canva without adding 5 different colored files. So do note, that if your SVG file has more than 5 colors, you will be unable to update the colors in Canva and will need to upload all color variations.
Now if you don’t have any SVG files of your branding elements, the next best file type will be PNG files that have a transparent background. This will ensure that there is no background on your branding elements so you can overlay them in different scenarios in your designs.
When uploading your Brand files you’ll have 4 different areas you can upload elements to! Every brand will be different and some of you will have some of these things and some of you won’t, so don’t worry if you have nothing for one specific section.
- Logos – This will include all your logo files, marks, or small logo icons. Everything logo related will go in this section.
- Photos – If you have custom brand images, or even go-to stock images that perfectly match your brand, you’ll upload them all to this section.
- Graphics – This will include any other elements of your brand that aren’t a logo, photo, or icon. So think of things like scrapbook tape, patterns, etc.
- Icons – Just what this means, if you have any icons that are specific to your brand, upload them all to this section.
Save Your Brand Kit: After inputting all your brand details, make sure to save your Brand Kit.
How to Set Up Multiple Brand Kits in Canva
I know we have a lot of multi-passionate entrepreneurs in our community, so you may have more than one business and therefore, have different looking brands. If you have multiple brands or need to manage various design identities, Canva allows you to set up multiple Brand Kits. To do this:
Access Brand Kit: In Canva, navigate to the “Brand” section as described earlier.
Create a New Brand Kit: You’ll find an option to “Create a New Brand Kit.” Click on this to start the process again for a different brand.
Repeat the Setup: Follow the same steps as mentioned above to add brand colors, fonts, logos, and design elements for your new brand.
Switch Between Brand Kits: You can easily switch between your different Brand Kits while working on your designs and we will go over that in the next section!
How to use your Brand Kit in a New Design
Now that you’ve set up your Brand Kit in Canva, it’s time to put it to work in your design projects. Here’s how to effectively use your Brand Kit elements in a new design:
Create a New Design: Start by creating a new design project in Canva using the blue button in the top right corner of the screen. Choose the item or custom size you’d like depending on what you’ll be creating.
Access Your Brand Kit: In the design editor, locate the “Brand” tab, found on the left-hand side of the screen. Click on it to access all your Brand Kit elements.
You’ll see the name of your Brand Kit at the top of the screen. If you need to flip to a different Brand Kit, you can use this drop down and easily flip it over!
Select Brand Colors: When working on your design, you can access your brand colors in 2 ways:
- On the left sidebar you’ll see your Color Pallette but the only option you’ll see is to shuffle the colors as you hover over it. This will randomly select colors based on your entire palette. I typically don’t use this option unless I’m working with a template.
- Next, and probably the most likely way you’ll adjust your colors, is to select the element in your design you’d like to adjust the color of. Then click on the color block icon in the top toolbar (or the A with a color block under if you’re editing text color). The color palette for your brand will pop up at the top and you can choose from any specific color right there with the options.
Add/Apply Brand Fonts: From the Fonts panel on the left of the screen after you select Brand, you can add a heading, subheading, or body font based on your selections that you identified in your Brand Kit. This will automatically add the text to the document in the correct font and you can easily adjust the color and size of the font to be what you’d like!
Insert Brand Logos: To incorporate your brand logos, go to the logo section of your Brand Kit on the left panel. You can easily add your logo to your design just by clicking on it and it will automatically insert it into your design. You can then adjust the positioning and size to best suit your design.
Utilize Design Elements: If your Brand Kit includes specific design elements, such as patterns or icons, incorporate them into your design as needed. Again, you’ll find these in the labeled sections and all you have to do is click on them to automatically add them to your design!
Maintain Consistency: Throughout the design process, keep referring to your Brand Kit. Ensure that all design elements, from colors and fonts to logos and other brand assets, align with your brand’s guidelines.
Save and Share: Once your design is complete, make sure to save it. Canva allows you to download your design in various formats or share it directly on social media or with your team.
How to use your Brand Kit using Canva Templates
One of the major advantages of creating a Brand Kit in Canva is its seamless integration with all the templates available in Canva. Here’s how to use your Brand Kit with Canva templates inside Canva, or our Canva Templates:
Select a Template: Start by browsing Canva’s vast template library and choose a design that best fits your project. Or If you’re using one of our Canva Bundles, you will open up the appropriate file to begin editing.
Customize the Template: After selecting a template, you’ll be taken to the design editor. Here, you can modify the template to suit your brand by incorporating your Brand Kit elements.
Access Your Brand Kit: On the left-hand side of the screen, click on the “Brand” icon to open your Canva Brand Kit elements. This tab provides quick access to your brand’s colors, fonts, logos, and other design elements.
Apply Brand Colors: Use the color palette from your Brand Kit to apply your brand’s primary and secondary colors to various elements in the template.
Again, when working with a template, you can access your brand colors in 2 ways:
- On the left sidebar you’ll see your Color Pallette but the only option you’ll see is to shuffle the colors as you hover over it. This will randomly select colors based on your entire palette and will update all the colors inside your template to match your branding colors. You can keep clicking this random option and it will rotate colors with each click. I typically don’t use this option as I don’t love the random selection of colors it selects. I’m a little too much of a control freak for that!
- Next, and probably the most likely way you’ll adjust your colors, is to select the element in your design you’d like to adjust the color of. Then click on the color block icon in the top toolbar (or the A with a color block under if you’re editing text color). The color palette for your brand will pop up at the top and you can choose from any specific color right there with the options.
Implement Brand Fonts: Applying your Brand Fonts to a templated design is like magic and so fun! You’ll click on the “Design” icon and then flip over to the Style section. Once there you’ll click on the Brand Fonts section under your Brand and it will magically update the fonts inside your Design Template! From there you can adjust the size, colors, and position if needed!
Insert Brand Logos or Design Elements: If your template includes space for logos, brand elements, or images, upload your brand logos from your Brand Kit just like I explained above.
Personalize Content: Customize the text, images, and other content of the template to align with your specific message!
Preview and Adjust: Before finalizing your design, take a moment to preview it. I like to download the file and view it from my phone to make sure that if the graphic I just created is seen on a phone everything on it can still be easily read. This is a very common mistake I see… the copy is entirely too small on mobile… so be sure to check this!
Save and Share: Once you’re satisfied with your customized template, save the design. Canva allows you to download it in various formats or share it directly on social media, via email, or with your team.
Using Canva templates with your Brand Kit not only simplifies the design process but also guarantees a consistent and professional appearance for all your brand-related materials. It empowers you to create eye-catching designs that capture your brand’s essence, while also saving you valuable time that can be better spent on other aspects of your business. Canva’s user-friendly interface and template library make it a powerful tool for design, whether you’re a design novice or a seasoned professional.
Have questions on anything covered here? I’m happy to help! Leave a comment below and I’ll be sure to get back with you!


